Title: Achieving the Perfect Military Crease: A Step-by-Step Guide
Introduction:
A military crease is a crisp, sharp crease that is an essential part of a military uniform’s presentation. It is not only a sign of discipline and professionalism but also a symbol of pride for those who serve their country. The military crease is also popular among law enforcement, firefighters, and even some businesses, which require their employees to maintain a neat, well-pressed appearance. In this blog post, we’ll go through a step-by-step guide on how to press a military crease to help you achieve that perfect, sharp look.
Materials You’ll Need:
- A clean, dry uniform shirt or blouse
- An ironing board
- An iron (with adjustable heat settings)
- Spray bottle with water or a starch spray
- A pressing cloth (optional)
Step-by-Step Guide:
- Preparing the Shirt:
Before you begin, make sure your shirt is clean and dry. Button up the shirt and ensure that it is properly aligned. You may also wish to use a starch spray or lightly mist the shirt with water to achieve a stiffer, crisper result.
- Ironing the Collar:
Place the collar flat on the ironing board, and iron it from the center outwards to the tips. Fold the collar along the crease line and iron it again, applying gentle pressure to create a crisp fold.
- Ironing the Front Panels:
Open the shirt and lay one front panel flat on the ironing board. If your shirt has pockets, iron around them first before moving on to the rest of the panel. Iron the panel, moving from the top towards the bottom. Repeat this process for the other front panel.
- Creating the Military Crease:
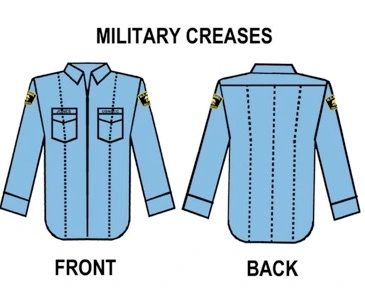
To create a military crease, you’ll need to fold and iron three sharp creases on the back of the shirt. The first crease runs vertically down the center of the back, while the other two creases run from the center of the shoulder seams to the center of the shirt’s tail.
a. Center Crease: Position the shirt on the ironing board with the backside facing up. Align the shirt’s side seams and shoulder seams to create a fold down the center of the back. Press the iron along the fold, creating a sharp crease from the yoke to the tail.
b. Shoulder Creases: Lay the shirt flat on the ironing board with the back facing up. Find the midpoint of each shoulder seam and fold the fabric inwards, creating an angled crease that runs from the shoulder seam to the center of the shirt’s tail. Press the iron along each fold to create a sharp crease.
- Ironing the Sleeves:
Lay one sleeve flat on the ironing board, making sure the seam is aligned with the center of the sleeve. Press the iron along the sleeve, moving from the shoulder towards the cuff. Repeat this process for the other sleeve.
- Final Touches:
Button up the shirt and hang it on a hanger. Inspect your work to ensure all creases are sharp and aligned. If necessary, use a pressing cloth to protect the fabric from scorching or shine, and make any final touch-ups with the iron.
Conclusion:
Achieving the perfect military crease takes patience, precision, and practice. However, the result is a sharp, professional appearance that showcases your attention to detail and discipline. Follow this step-by-step guide, and you’ll be on your way to mastering the art of pressing a military crease.